 Hi guys, been two weeks, It's the first week of March and the first week of Autumn in Australia. Well, for one, my autumn started with my little Savannah being sick for straight two weeks, and has just gotten off antibiotics, that I get to sigh in relief. Little ones, it's just hard to bear seeing them in pain and discomfort, you just want to cuddle them all day if only to take the burden away.
 So, this weekend, I had some time to revisit my sewing room and had completed another tutorial- for leggings up cycled from t-shirts I got from the op shop again? Yep, I frequent Vinnies these days, as it's just a cough away from where I live. Well- what with winter coming, I wanted to stock up on leggings to keep my little Savannah's little legs warm and cozy and cute. :)
Firstly, get your daughter's most comfortable leggings and trace the pattern if you are not up to sizing her up. Remember the front and back crotch are different, being the latter should have more depth to accommodate the bum of your girl. My Savannah is a size three in leggings so this was how the pattern turned out. These are on fold, take note when cutting the fabric.
So you now have two folded pieces of pattern
Stitch both inside of legs as shown in the picture that I am pointing at. Right sides together please.
As you can see, you have to serge, over lock the edges to avoid fraying, This fabric by the way, is stripy but stretch knit, so it has a lot of give in movement.
Pull one leg inside out and insert it in the inside of the other leg( right sides should attach together) as shown in the picture.
It should now be looking like this before you stitch the crotch part.
Right sides facing together. :)
Off you go, stitch them together.
Turn them inside out now. leggings, almost done.
Start hemming the waist by folding an inch and half, tucking in the 1/2" before stitching. Make sure to leave a one inch gap for the elastic to go through.

Using a safety pin feed the elastic through the casing at the waist.
When you have gotten to both ends, secure/stitch them together with a zigzag stitch, now here, get a half by half inch of scrap fabric and lay it under the elastic ends before stitching, this will prevent bunching of the hem.
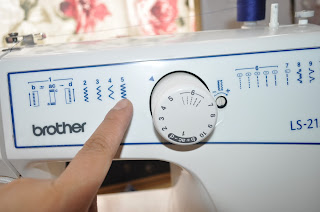
Set your machine to zigzag stitch.
Then go zigzagging, :) Then secure the gap.
It's time to hem the lower leg part.
And you now have leggings. But because I wanted to put some accent on the leggings, I decided to put a big bow on the back part.
It depends on how big you want your bow to be, in my case, I cut two rectangles. a 5 "x8" and a 3" x 2" .
If you can see the lines I drew on them, stitch them and leave a gap for pulling it inside out.
Don't forget to top stitch the bow.
Feed the bow through the smaller triangle.
Attach by stitching the bow on the back part of the leggings.
I made several variations, check them out, you can derive inspiration from here, no more boring leggings. :)
Oh this green jacket is what was left of the blue and green t-shirt I made from the leggings above. I did not waste any of the scraps.:). My Savannah sure enjoyed her new autumn outfits. :)
I hope you find this tutorial helpful. Have a nice week ahead. :) By the way, check my facebook page at www.facebook.com/mestesmadeit.
Cheers!


No comments:
Post a Comment